Version 0.22.x
This documentation relates to the latest Pustefix release from the 0.22 line.
Copyright © 2007-2017
Table of Contents
- Introduction
- 1. Getting started
- 2. Basic tutorial
- 2.1. Setting up a new project
- 2.2. Generated files
- 2.3. Creating the pages
- 2.4. Setting the entry page
- 2.5. Create the input form
- 2.6. Implementing the business logic
- 2.7. Implementing the workflow
- 2.8. Displaying errors
- 2.9. Displaying the entered data
- 2.10. Saving the data
- 2.11. The finishing touch
- 2.12. Conclusion
- 3. AJAX Calculator tutorial
List of Figures
These tutorials are meant as a starting point for developers that have never worked with Pustefix. They introduce you to the different types of applications that can be implemented with Pustefix. Of course, they can only scratch at the surface of most of the features, if you are interested in an in-depth look at Pustefix, refer to the reference documentation.
You can either work through the tutorial by following the instructions and create the applications from scratch (the preferred way for first-time Pustefix users) or you can just check out the complete source code (see Section 1.3, “Getting the source code”).
Table of Contents
Before we can get started, you have to make sure that some requirements are met by your development environment. You will need:
- JDK 8 or higher
- POSIX-like operating system (Pustefix has been tested with Linux and Mac OS X, but might also work with other systems like *BSD)
- Apache Maven 3 or higher
The installation of these tools is not covered by this tutorial. Please refer to the documentation provided with these tools for installation instructions.
Pustefix provides some Maven archetypes for quickly creating new applications.
A good starting point is the basic application archetype.
Just call mvn archetype:generate
and select the archetype org.pustefixframework:pustefix-archetype-basic:
$ mvn archetype:generate -Dfilter=pustefix
After choosing the pustefix-archetype-basic Maven will ask you for your project's groupId,
artifactId, version and package.
Having finished these settings Maven will generate the new project within a new directory called like the artifactId
and located within the current working directory (default is myapp).
$ cd myapp
$ mvn tomcat7:run-war
The generated project is a standard Maven project with war packaging type, i.e. you can immediately build and
run your application, e.g. using Tomcat by calling mvn tomcat7:run-war and
opening http://localhost:8080 in your browser.
The source code used in the tutorials is available for public checkout. To test the tutorials on your local development machine, execute the following commands:
$ git clone https://github.com/pustefix-projects/pustefix-framework.git pustefix
$ cd pustefix
$ git checkout -b tutorial `git tag -l "pustefixframework-*" --sort v:refname | tail -1`
$ cd pustefix-tutorial/first-app
$ mvn tomcat7:run-war
This will clone the Pustefix Git repository, checkout/branch the latest Pustefix release tag, and run the tutorial application.
Table of Contents
- 2.1. Setting up a new project
- 2.2. Generated files
- 2.3. Creating the pages
- 2.4. Setting the entry page
- 2.5. Create the input form
- 2.6. Implementing the business logic
- 2.7. Implementing the workflow
- 2.8. Displaying errors
- 2.9. Displaying the entered data
- 2.10. Saving the data
- 2.11. The finishing touch
- 2.12. Conclusion
In this tutorial, you will learn how to work with the basic features provided by the Pustefix framework. You will accept user input, store it in the session and display it back to the user. Furthermore, you will create a very simple workflow containing three pages.
The requirements for your application are:
Provide an HTML form that can be used to register new users. The data for a new user must contain: gender, name, email-address, homepage, date of birth and a flag to mark the user as an administrator.
Validate the user data after the page has been submitted and display error information.
If the entered data is correct, move to a new page, which displays the user data and allows the user to choose whether he wants to go back and modify the data or accept the data.
After the data has been stored, display a confirmation page to the user.
In this tutorial application, you will focus on how the requirements will be implemented in the Pustefix framework. There will be no real business logic like actually storing the user data in any data base. These tasks are left to your favorite ORM framework.
Before you can start developing the application, make sure that your system fulfills all requirements that are mentioned in Section 1.1, “Requirements”.
If your environment is set up correctly, you may create a new Pustefix project. For this tutorial, please name the project firstapp. A new Pustefix project can be created using a Maven archetype as described in Section 1.2, “Generating a new project from a Maven archetype”. The project name corresponds to the artifactId, so you should enter firstapp when you're asked by Maven. You should further choose org.pustefixframework.tutorial as groupId and org.pustefixframework.tutorial.firstapp as package name (you can choose other names, but you will have to replace the recommended names wherever used in this tutorial).
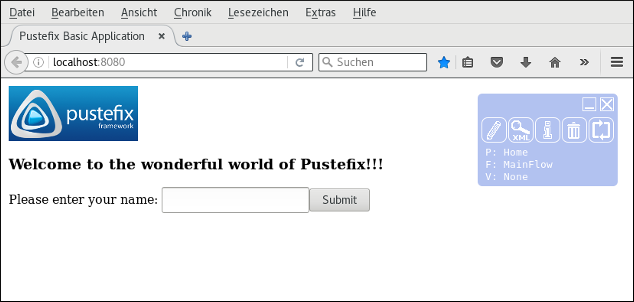
After Maven successfully created the new project, you can start it using mvn tomcat7:run-war
and open it in your browser under http://localhost:8080.
Figure Figure 2.1, “The new Pustefix project” shows the output of the new Pustefix project.
Maven generated a working application for you. All relevant files have been put
into the firstapp folder within your working directory. Please take a look at the most important folders:
The
src/main/webapp/WEB-INFfolder contains all configuration files for your applications. These are:project.xmlcontains general project information, framework configuration, e.g. for the rendering system, exception processing, path mappings for static resources, etc.app.xmlcontains the configuration concerning the Java part of the application, e.g. pagerequests and assigned Java framework classesdepend.xmlcontains the configuration concerning the XML/XSLT part of the application, e.g. pages and XSL stylesheets used in your project.web.xmlcontains servlet configuration and mappings.spring.xmlis empty by default and can be used to configure your Spring beans.pfixlog.xmlcontains the log4j configuration.
The
src/main/webappfolder also contains resource folders. These are:The
cssandimgfolders contain CSS files and images which should be delivered as static resources.The
txtfolder contains the web pages, i.e. the according XML content and fragments.The
xmlfolder contains the different frames of your application. A frame is an XML document which will be used for every page that is generated. This way, you can easily share header, footer and navigation between all pages.The
xslfolder contains XSL stylesheets that are only used in your application (not including XSL stylesheets provided by Pustefix itself).
Start implementing your application by adding the three needed pages to the application:
EnterData, ReviewData and Confirm.
New pages are added by editing the src/main/webapp/WEB-INF/depend.xml file. For each page, you
have to add an XML element defining which layout XML file should be used (the common base layout of the pages).
You can just remove or alter the according tags for the predefined pages. The new configuration should look like this:
<?xml version="1.0" encoding="utf-8"?>
<make lang="en_GB" project="firstapp">

  <!--
    Additional stuff, like configuration of namespaces and XSL transformation levels.
  -->

  <standardpage name="EnterData" xml="xml/frame.xml"/>
  <standardpage name="ReviewData" xml="xml/frame.xml"/>
  <standardpage name="Confirm" xml="xml/frame.xml"/>

</make>
You can now open the EnterData page by browsing to http://localhost:8080/EnterData.
As you did not provide any content for this page, Pustefix will display an error icon. When hovering
over this icon, you can see, that the content of the page in the file txt/pages/EnterData.xml
is missing.
This problem can easily be solved by adding the file src/main/webapp/txt/pages/EnterData.xml:
<?xml version="1.0" encoding="utf-8"?>
<include_parts xmlns:ixsl="http://www.w3.org/1999/XSL/Transform" xmlns:pfx="http://www.schlund.de/pustefix/core">
  <part name="content">
    <theme name="default">
      <h1>Register new user</h1>
    </theme>
  </part>
</include_parts>
If you reload the page, you will see the Register new user headline. Now repeat this
step for all three pages (you can remove/alter the predefined pages which are no longer used).
If you open the application in your browser without specifying the page directly, Pustefix will
try to display the page Home, which is the default page generated by the Maven archetype (you will get
an error message, if you already removed the page in the previous step). Desired behaviour would
be, that the EnterData page is displayed, when your application is started.
This can be changed in the configuration in src/main/webapp/WEB-INF/app.xml:
<?xml version="1.0" encoding="utf-8"?>
<context-xml-service-config>

  <global-config />

  <context defaultpage="EnterData">
    ...
  </context>

  ...

</context-xml-service-config>
The entry page is specified using the defaultpage attribute of the
<context/> tag. After you set this attribute to EnterData
open the URL http://localhost:8080 in your browser and
you will see that the content of EnterData appears.
After you changed the entry page, you can get completely rid of the generated/predefined pages by following these steps (if not already done before):
Delete the XML files for the predefined pages from the
src/main/webapp/txt/pagesfolder.Remove the
<pagerequest/>and<pageflow>tags for the predefined pages from thesrc/main/webapp/WEB-INF/app.xmlfile.Remove the
<standardpage/>tags for the predefined pages from thesrc/main/webapp/WEB-INF/depend.xmlfile.
Next, you have to create the HTML form to accept the data of a new user. To create the form, you should not use the standard HTML tags, but the replacements by Pustefix, which automatically write back the data from the business logic to the HTML page.
The form has to be added to txt/pages/EnterData.xml:
<?xml version="1.0" encoding="utf-8"?>
<include_parts xmlns:ixsl="http://www.w3.org/1999/XSL/Transform"
               xmlns:pfx="http://www.schlund.de/pustefix/core">

  <part name="content">
    <theme name="default">

      <h1>Register new user</h1>

      <pfx:forminput>

        <div>
          <label>Gender:</label>
          <pfx:xinp type="select" name="user.sex">
            <pfx:option value="m">male</pfx:option>
            <pfx:option value="f">female</pfx:option>
          </pfx:xinp>
        </div>

        <div>
          <label>Name:</label>
          <pfx:xinp type="text" name="user.name"/>
        </div>

        <div>
          <label>Email:</label>
          <pfx:xinp type="text" name="user.email"/>
        </div>

        <div>
          <label>Homepage:</label>
          <pfx:xinp type="text" name="user.homepage"/>
        </div>

        <div>
          <label>Birthday:</label>
          <pfx:xinp type="text" name="user.birthday"/>
        </div>

        <div>
          <label>Administrator:</label>
          <pfx:xinp type="check" name="user.admin" value="true"/>
        </div>

        <pfx:xinp type="submit" value="Register"/>

      </pfx:forminput>

    </theme>
  </part>
 </include_parts>
See the Pustefix reference documentation for more information about the XML tags that have been used in this page.
Now that you have finished most of the HTML frontend, you should start implementing the business logic. The business logic in Pustefix applications mostly consists of three parts:
A
wrapperis used to extract the user input from the HTTP-request, executes some checks and casts the data to the desired Java types. Awrapperis also used to write the values and/or error information back to the response. It connects your HTML frontend with your application logic.A
handlerprocesses the HTTP request. It extracts the user input from thewrapper, executes additional information and does whatever is necessary in the specific application. You have all the power provided by Java at your command when implementing ahandler.A handler does not have direct access to the HTTP request, HTTP session or HTTP response.
A Spring managed bean having session scope to store the data in the current session (also historically referred to as
ContextResource).It provides the data model for a page, which will be made available to the frontend in XML form, either by automatically deserializing it to XML or let it programmatically create XML by itself.
When implementing the business logic you will always start by implementing a wrapper. Wrappers in Pustefix usually are implemented using XML, which will then be used to generate a Java class for the wrapper. Alternatively Wrappers can be defined using annotated Java beans (see the reference documentation).
Before you can implement a new wrapper, you will have to create a new Java package org.pustefixframework.tutorial.firstapp.wrapper
which will then contain the new wrapper (if you started with the Maven archetype, the package should already exist). After the package has been created, create a new EnterUserDataWrapper.iwrp file for the wrapper
and paste the following content into this new file:
<interface xmlns="http://www.pustefix-framework.org/2008/namespace/iwrapper"
           xmlns:xsi="http://www.w3.org/2001/XMLSchema-instance"
           xsi:schemaLocation="http://www.pustefix-framework.org/2008/namespace/iwrapper
                               http://www.pustefix-framework.org/2008/namespace/iwrapper.xsd">

  <!-- This handler will process the data -->
  <ihandler class="org.pustefixframework.tutorial.firstapp.handler.EnterUserDataHandler"/>

  <!-- Parameters that have to be extracted from the request -->
  <param name="sex" type="java.lang.String" occurrence="mandatory"/>
  <param name="name" type="java.lang.String" occurrence="mandatory"/>
  <param name="email" type="java.lang.String" occurrence="mandatory"/>
  <param name="homepage" type="java.lang.String" occurrence="optional"/>
  <param name="birthday" type="java.lang.String" occurrence="optional"/>
  <param name="admin" type="java.lang.Boolean" occurrence="optional">
    <default>
      <value>false</value>
    </default>
    <caster class="de.schlund.pfixcore.generator.casters.ToBoolean"/>
  </param>
</interface>
The wrapper defines various options:
Using the
<ihandler/>tag, you define the name of the class that will do the request processing for this handler. This class will be implemented at a later point (see Section 2.6.3, “Implementing a handler” if you are too curious).The different
<param/>tags are used to define the different parameters that should be extracted from the HTTP request. For each parameter you define the name and the type of the data. All parameters except the admin-flag are String parameters, the admin-flag should be casted to abooleanvalue. This can be achieved by setting thetypeattribute tojava.lang.Booleanand supplying a<caster/>tag that specifies a class to to the conversion for you. The classde.schlund.pfixcore.generator.casters.ToBooleanis provided by the Pustefix framework.For each parameter you may also specify a default value and define whether the parameter is mandatory or not. For more information on the differen
wrapperfeatures, please refer to the reference documentation.
After you created the iwrp definition, please run mvn generate-sources to
generate the Java class for this wrapper:
$ mvn generate-sources
[INFO] Scanning for projects...
[INFO] ------------------------------------------------------------------------
[INFO] Building Pustefix Basic Application
[INFO]    task-segment: [generate-sources]
[INFO] ------------------------------------------------------------------------
...
[INFO] [pustefix-iwrapper:generate {execution: default}]
[INFO] Generated 1 IWrapper class
[INFO] ------------------------------------------------------------------------
[INFO] BUILD SUCCESSFUL
[INFO] ------------------------------------------------------------------------
...
After Maven has finished the build, you will find a new class
org.pustefixframework.tutorial.firstapp.wrapper.EnterUserDataWrapper in the
target/generated-sources/iwrapper folder of your installation.
This file contains all information needed to extract the parameters from the request.
If you refresh your IDE or compile you will get an error because the generated class references an IHandler class which doesn't exist and will be created later in this tutorial.
Now that you have implemented the HTML page and the wrapper you have to connect the HTML form with
the wrapper. This is done using the app.xml configuration. If a page
contains business logic that must be executed, you have to add a <pagerequest/>
tag for it.
Place an <input/> tag inside the <pagerequest/> tag which
will act as a container for all wrappers on this page.
Each wrapper is registered using an <wrapper/> tag which requires two parameters
to be set:
classspecifies the classname of the wrapper.prefixspecifies the prefix of all request parameters that this wrapper should pay attention to. If you take a look the the HTML page (Section 2.5, “Create the input form”) you will see, that all input fields are prefixed withuserand a dot. This way, you can have two wrappers that share parameter names, but will not conflict, as the parameters reside in different namespaces.
To add your new wrapper to the EnterData page, add these lines to the configuration:
<?xml version="1.0" encoding="utf-8"?>
<context-xml-service-config>

  <!-- ... -->

  <pagerequest name="EnterData">
    <input>
      <wrapper prefix="user" class="org.pustefixframework.tutorial.firstapp.wrapper.EnterUserDataWrapper" />
    </input>
  </pagerequest>

</context-xml-service-config>
The next step will be implementing a handler processing the wrapped data. But before you can go on and implement the handler, there is a small task left. Up to now, you do not have a Java type that is able to store the data for a user. This will be done in your next step.
As you need to store the data submitted by the user, you will need a bean, that is able to store all the information. The following class is a very simple implementation, in your applications you might already have these beans or use a framework, that is generating them for you.
package org.pustefixframework.tutorial.firstapp;

public class User {
    private String name;
    private String email;
    private String birthday;
    private boolean admin;
    private String homepage;
    private String sex;

    public String getName() {
        return name;
    }

    public void setName(String name) {
        this.name = name;
    }

    public String getEmail() {
        return email;
    }

    public void setEmail(String email) {
        this.email = email;
    }

    public String getBirthday() {
        return birthday;
    }

    public void setBirthday(String birthday) {
        this.birthday = birthday;
    }

    public boolean getAdmin() {
        return admin;
    }

    public void setAdmin(boolean admin) {
        this.admin = admin;
    }

    public String getHomepage() {
        return homepage;
    }

    public void setHomepage(String homepage) {
        this.homepage = homepage;
    }

    public String getSex() {
        return sex;
    }

    public void setSex(String sex) {
        this.sex = sex;
    }
}
This bean contains exactly the same properties as the wrapper you defined earlier. You will later use this class to store the user information in the session.
The bean additionally will be used to make the data available in the XSL view (by automatically serializing it to XML).
Add the bean to the Spring configuration src/main/webapp/WEB-INF/spring.xml to make it available
as session-scoped bean:
<?xml version="1.0" encoding="UTF-8"?>
<beans xmlns="http://www.springframework.org/schema/beans">

  ...

  <bean id="user" class="org.pustefixframework.tutorial.firstapp.User" scope="session">
    <aop:scoped-proxy/>
  </bean>

</beans>
A handler is responsible to execute the actual business logic of your application. A handler can be any class but is has some requirements that have to be met:
It has to implement the
org.pustefixframework.web.mvc.InputHandlerinterface (replacement for the old non-generic, but still supported,de.schlund.pfixcore.generator.IHandlerinterface).As handlers are used as flyweights, they must not have any static non-final properties.
If you use your IDE to generate a new EnterUserDataHandler class that implements the
InputHandler interface, you get the following code:
package org.pustefixframework.tutorial.firstapp.handler;

import org.pustefixframework.tutorial.firstapp.wrapper.EnterUserDataWrapper;
import org.pustefixframework.web.mvc.InputHandler;

public class EnterUserDataHandler implements InputHandler<EnterUserDataWrapper> {

    public void handleSubmittedData(EnterUserDataWrapper wrapper) {
    }

    public boolean isActive() {
        return false;
    }

    public boolean needsData() {
        return false;
    }

    public boolean prerequisitesMet() {
        return false;
    }

    public void retrieveCurrentStatus(EnterUserDataWrapper wrapper) {
    }
}
If you now (re-)start your application and open the page again, you still get an error, that the page is still not accessible. This is because of the return values of the generated methods and how Pustefix processes a request.
When a page is requested, Pustefix calls the
prerequisitesMetmethod of all handlers that are configured for this page. If any of these methods returnfalse, the page will not be displayed.If all of these methods return
true, Pustefix will call theisActivemethod on all handlers of the page. If none of the methods returntrue, the page will not be displayed.
When your IDE generated the method bodies, both methods return false und thus the page
cannot be displayed.
Modify the return values of prerequisitesMet and isActive to
make the page accessible
public class EnterUserDataHandler implements InputHandler<EnterUserDataWrapper> {

    public boolean isActive() {
        return true;
    }

    public boolean prerequisitesMet() {
        return true;
    }
}
If you now restart the application and open the page again, all form fields will be displayed. To test your form, fill out at least the mandatory fields:
gender
name
email
If you submit the data, the wrapper will validate your data and then display the page again. At this point, the form elements will still contain the values that you entered. Pustefix saved their state automatically.
If you click on the XML button in the upper right corner of the page, you will see the
XML document that contains the data of the rendered page:
<formresult serial="1470048746036" trigger="submit">
   <formvalues>
      <param name="user.email">myemail</param>
      <param name="user.name">myname</param>
      <param name="user.sex">m</param>
   </formvalues>
   <formerrors />
   <formhiddenvals />
   <wrapperstatus>
      <wrapper active="true" name="org.pustefixframework.tutorial.firstapp.wrapper.EnterUserDataWrapper" prefix="user" />
   </wrapperstatus>
</formresult>
The <formvalues/> node contains a <param/> element for each
of the form fields that you submitted. Inside the <wrapperstatus/> node, you can see a list
of all wrappers that are registered for this page.
As the handler mostly consists of auto-generated code, it does not execute any business logic. If you want
to execute Java code after the page is submitted, you only need to place it in the handleSubmittedData
method
package org.pustefixframework.tutorial.firstapp.handler;

import org.pustefixframework.tutorial.firstapp.User;
import org.pustefixframework.tutorial.firstapp.wrapper.EnterUserDataWrapper;
import org.pustefixframework.web.mvc.InputHandler;
import org.springframework.beans.factory.annotation.Autowired;

public class EnterUserDataHandler implements InputHandler<EnterUserDataWrapper> {

    @Autowired
    User user;

    public void handleSubmittedData(EnterUserDataWrapper wrapper) {
        user.setSex(wrapper.getSex());
        user.setName(wrapper.getName());
        user.setEmail(wrapper.getEmail());
        user.setHomepage(wrapper.getHomepage());
        user.setBirthday(wrapper.getBirthday());
        user.setAdmin(wrapper.getAdmin());
    }
}
You already configured a session-scoped Spring bean for storing the user data. You can inject the bean into the handler using the Spring autowiring mechanism.
Pustefix will fill the previously generated wrapper object with the submitted data and after having successfully checked and
casted the data, it will pass it to the handleSubmittedData method, where you can
take the data and put in the User bean.
Now you have implemented the business logic, that stores your User data in the session,
but still, the EnterData page is displayed, after you submitted the page. The desired behaviour is to display
the ReviewData after the business logic has successfully been executed.
To achieve this, you have to create a new workflow and specify the steps in this workflow. This is done via the <pageflow/> tag
in the configuration file:
<?xml version="1.0" encoding="utf-8"?>
<context-xml-service-config>

  <!-- configuration start -->

  <pageflow name="RegisterUser" final="Confirm">
    <flowstep name="EnterData"/>
    <flowstep name="ReviewData" stophere="true"/>
  </pageflow>

  <!-- pagerequest configuration -->

</context-xml-service-config>
The workflow starts with the EnterData page, which is followed by the ReviewData page. After the page flow
is finished, the final page Confirm will be displayed. Open the EnterData page again, after you made the changes,
fill out the mandatory fields and submit them: the page flow will lead you to the ReviewData page, as you specified in the configuration.
Up to now, you expected, that the users of your application do not make any mistakes. We all know, that this is not the case for
real-life users. To test, how the application reacts, if you do not fill out all required fields, open the EnterData
page again, leave the name field empty and submit the page.
As you can see, Pustefix is clever enough not to continue the page flow. If you would debug the application, you would see, that Pustefix
even does not execute the handleSubmittedData method of your handler. This is because the generated wrapper class does
some basic validation on the input data. As you specified the name parameter as mandatory, the data
is not valid and the wrapper is not passed to the handler.
But how is the user supposed to know, why the page flow is not processed, there is no error message. But this is not completely true. Pustefix sends you an error message, but your page does not display it. If you open the DOM-tree view again, you will see a difference in the XML document that is used for the page rendering:
<formresult serial="1214248690859">
      <formvalues>
          <param name="user.email">schst@bar.de</param>
          <param name="user.sex">m</param>
      </formvalues>
      <formerrors>
          <error name="user.name">
              <pfx:include href="core-override/dyntxt/statusmessages-core-merged.xml" part="MISSING_PARAM"/>
          </error>
      </formerrors>
      <formhiddenvals/>
      <wrapperstatus>
          <wrapper active="true" name="org.pustefixframework.tutorial.firstapp.wrapper.EnterUserDataWrapper" prefix="user"/>
      </wrapperstatus>
      <pageflow name="RegisterUser">
          <step current="true" name="EnterData"/>
          <step name="ReviewData"/>
      </pageflow>
  </formresult>
Inside the <formerrors/> node, there is an <error/> element which signals an
error for the field user.name. The content of the error is an include to the part MISSING_PARAM
in the file core-override/dyntxt/statusmessages-core-merged.xml. This file contains all error messages
provided by the core. If you open the file and search for this part, you will find something ike this XML:
<part name="MISSING_PARAM">
  <theme name="default">This parameter is mandatory.</theme>
</part>
As you can see, Pustefix informs you, that an error happened, and even provides you with a human readable message for the error. All
that is left for you to do, is display it to the user. This can be done using the <pfx:checkfield/>, <pfx:error/>
and <pfx:scode/> tags provided by Pustefix.
To add the error message, open the page content file txt/pages/EnterData.xml. The <pfx:checkfield/> tag
is used to check, whether an error happened for a specific field or not. Inside this tag, you can place a <pfx:error/> tag. The
content of this tag will only be displayed, if an error occurred for this field. The <pfx:scode/> tag is an easy way
to fetch the error message from the core-override/dyntxt/statusmessages-core-merged.xml file.
<?xml version="1.0" encoding="utf-8"?>
<include_parts xmlns:ixsl="http://www.w3.org/1999/XSL/Transform"
               xmlns:pfx="http://www.schlund.de/pustefix/core">

  <part name="content">
    <theme name="default">

      <h1>Register new user</h1>

      <pfx:forminput>

        <!-- Other form fields -->

        <div>
          <label>Name:</label>
          <pfx:xinp type="text" name="user.name"/>
          <pfx:checkfield name="user.name">
            <pfx:error><span class="{$pfx_class}"><pfx:scode/></span></pfx:error>
          </pfx:checkfield>
        </div>

        <!-- Other form fields -->

        <pfx:xinp type="submit" value="Register"/>

      </pfx:forminput>

    </theme>
  </part>
 </include_parts>
If you now try to submit the page again without entering your name, Pustefix will display the correct error message. Of course, you have to repeat this step for all other input fields on your page.
Now that your application is displaying errors correctly, you should go back to implement the main requirements. The next feature that you will be implementing is the review page, where the user will be able to review has data. To achieve this, you will have to write the user data to the DOM tree, that is used to render the page.
You can either let Pustefix automatically serialize your Spring bean to XML, or you can do it by yourself by creating/adding according XML nodes programmatically.
Automatic serialization can be done using Pustefix's own XML serialization mechanism or the JAXB standard. Doing it programmatically,
you have to add a method to your bean, annotate it with InsertStatus and implement it using the DOM API.
package org.pustefixframework.tutorial.firstapp;

import org.w3c.dom.Element;
import de.schlund.pfixcore.beans.InsertStatus;

public class User {

    @InsertStatus
    public void toXML(Element element) {
        if(name != null) {
            element.setAttribute("name", name);
        }
        if(email != null) {
            element.setAttribute("email", email);
        }
        if(birthday != null) {
            element.setAttribute("birthday", birthday);
        }
        if(homepage != null) {
            element.setAttribute("homepage", homepage);
        }
        if(sex != null) {
            element.setAttribute("sex", sex);
        }
        element.setAttribute("admin", String.valueOf(admin));
    }

}
In this example you can omit this method, because in the absence of an annotated method Pustefix uses its own default mechanism, which will result in the creation of exactly the same XML nodes here.
You just have to tell Pustefix, on which pages, the bean should be rendered. Again, this is done in the onfiguration file app.xml.
This time, you will have to add an <output/> tag to the page and nest <resource/> tags for each
bean, that should be rendered on this page.
<?xml version="1.0" encoding="utf-8"?>
<context-xml-service-config>

  <!-- other configuration options -->

  <pagerequest name="ReviewData">
    <output>
      <resource node="user" bean-ref="user"/>
    </output>
  </pagerequest>

</context-xml-service-config>
The bean-ref attribute references the name of the User bean, which you already have configured
in the Spring configuration file spring.xml.
Open the XML view for the page, after you made the changes and reloaded the page and you will see, that the user data has been inserted into the XML:
<formresult serial="1470123298547" trigger="flow">
   <formvalues />
   <formerrors />
   <formhiddenvals />
   <user admin="false" email="myemail" name="myname" sex="m" />
   <pageflow final="Confirm" name="RegisterUser">
      <step name="EnterData" />
      <step current="true" name="ReviewData" />
   </pageflow>
</formresult>
Pustefix allows you to use XSL and XPath in your page definitions to insert this information in the rendered page. Use the ixsl
namespace to access nodes from the DOM tree:
<?xml version="1.0" encoding="utf-8"?>
<include_parts xmlns:ixsl="http://www.w3.org/1999/XSL/Transform"
               xmlns:pfx="http://www.schlund.de/pustefix/core">
  <part name="content">
    <theme name="default">
      <h1>Review your data</h1>
      <div class="table">
        <div>
          <div>Gender:</div>
          <div>
            <ixsl:choose>
              <ixsl:when test="/formresult/user/gender/text() = 'f'">female</ixsl:when>
              <ixsl:otherwise>male</ixsl:otherwise>
            </ixsl:choose>
          </div>
        </div>
        <div>
          <div>Name:</div>
          <div><ixsl:value-of select="/formresult/user/@name"/></div>
        </div>
        <div>
          <div>Email:</div>
          <div><ixsl:value-of select="/formresult/user/@email"/></div>
        </div>
        <div>
          <div>Homepage:</div>
          <div><ixsl:value-of select="/formresult/user/@homepage"/></div>
        </div>
        <div>
          <div>Birthday:</div>
          <div><ixsl:value-of select="/formresult/user/@birthday"/></div>
        </div>
        <div>
          <div>Administrator:</div>
          <div><ixsl:value-of select="/formresult/user/@admin"/></div>
        </div>
      </div>
    </theme>
  </part>
 </include_parts>
If you now open the page again, enter your data and submit the form, Pustefix will display a new page, which contains the information you entered.
Your application now handles the input of user data and displays it again to the user. To complete the last requirement, your application
will have to provide another button on the ReviewData page, which lets the user confirm the data and then executes
the business logic to store the data in your persistence layer.
To achieve this, you will have to implement a new pair of wrapper and handler. As the ReviewData page does not
contain any input fields, the new wrapper does not need any parameters:
<interface xmlns="http://www.pustefix-framework.org/2008/namespace/iwrapper"
      xmlns:xsi="http://www.w3.org/2001/XMLSchema-instance"
      xsi:schemaLocation="http://www.pustefix-framework.org/2008/namespace/iwrapper
                          http://www.pustefix-framework.org/2008/namespace/iwrapper.xsd">

  <!-- This handler will process the data -->
  <ihandler class="org.pustefixframework.tutorial.firstapp.handler.SaveUserDataHandler"/>
</interface>
After you implemented the wrapper, continue by creating a new SaveUserData class, which implements the
IHandler interface. Make sure that the handler is active by returning true from the
prerequisitesMet and isActive methods. Place the business logic that saves the new user
in the handleSubmittedData method. In this example, the business logic has been replaced by a simple
System.out.println call.
package org.pustefixframework.tutorial.firstapp.handler;

import org.pustefixframework.tutorial.firstapp.wrapper.SaveUserDataWrapper;
import org.pustefixframework.web.mvc.InputHandler;

public class SaveUserDataHandler implements InputHandler<SaveUserDataWrapper> {

    public void handleSubmittedData(SaveUserDataWrapper wrapper) {
        System.out.println("Business logic to save data");
    }

    public boolean isActive() {
        return true;
    }

    public boolean needsData() {
        return false;
    }

    public boolean prerequisitesMet() {
        return true;
    }

    public void retrieveCurrentStatus(SaveUserDataWrapper wrapper) {
        // Nothing to be done here
    }

}
As the handler should be triggered from the ReviewData page, you have to add the handler to the
<pagerequest/> tag in the configuration:
<?xml version="1.0" encoding="utf-8"?>
<context-xml-service-config>

  <pagerequest name="ReviewData">
    <input>
      <wrapper prefix="user" class="org.pustefixframework.tutorial.firstapp.wrapper.SaveUserDataWrapper" />
    </input>
    <output>
      <resource node="user" bean-ref="user"/>
    </output>
  </pagerequest>

</context-xml-service-config>
All that is left your you now, is to add a possibility to submit the ReviewData page. But as there is no
input form needed, you will learn a new way, how data can be submitted using Pustefix. The <pfx:button/>
tag is used, to create links between different Pustefix pages. But it can also be used to link to the same page again and
pass any arguments using the <pfx:argument/>. If you use the <pfx:argument/>
tag, Pustefix will treat the request as if the page had been submitted and call the handleSubmittedData method
on all handlers on the page.
As your handler does not accept any parameters, you can pass any argument as you like, for example setting the argument
user.save to true.
<?xml version="1.0" encoding="utf-8"?>
<include_parts xmlns:ixsl="http://www.w3.org/1999/XSL/Transform" xmlns:pfx="http://www.schlund.de/pustefix/core">
  <part name="content">
    <theme name="default">
      <h1>Review your data</h1>
      <!-- Display user data -->
      <pfx:button>
        <pfx:argument name="user.save">true</pfx:argument>
        Go ahead and save the data
      </pfx:button>
    </theme>
  </part>
 </include_parts>
If you click on this link, the page will be submitted and if you placed the business logic inside the handler, it will be executed.
Open the txt/pages/Confirm.xml file and add some HTML, that will be displayed after the Pustefix
workflow will continue to the last page.
<?xml version="1.0" encoding="utf-8"?>
<include_parts xmlns:ixsl="http://www.w3.org/1999/XSL/Transform" xmlns:pfx="http://www.schlund.de/pustefix/core">
  <part name="content">
    <theme name="default">
      <h1>Congratulations</h1>
      <p>Your data has been saved</p>
    </theme>
  </part>
 </include_parts>
Now you have implemented all specified requirements and finished your first Pustefix application.
In the last part of the tutorial you will polish some of the rough edges of your applications, which you did not deal with while implementing the application.
Although your application is already working, there are some minor problems that you should deal with.
In a typical application, the review page does not only display the entered data, but offer you a link to go back and modify the data you entered before. Your application currently lacks this feature, but you will now learn how this is implemented in Pustefix.
At first, you have to add a new link to the ReviewData.xml page, which sends the user back to the
EnterData page. This can be done using the <pfx:button/> tag:
<pfx:button page="EnterData">Go back and edit data</pfx:button>
If you click on this link, the EnterData page will be loaded and the form will be displayed again.
But the application does not behave exactly as you would like it to, as the form fields are empty and not filled with
the data that the user entered before. This can be easily changed.
Every time a page is rendered, Pustefix will call the retrieveCurrentStatus method of all handlers that
are registered for the page and pass the matching wrapper for the handler. In this method
you may use the generated setter methods of the wrapper class to assign values to the form fields.
To prefill the form fields with the values the user entered before, you need to get the User bean
and transfer its values to the according wrapper fields. This is almost the opposite of what you
implemented in the handleSubmittedData method:
package org.pustefixframework.tutorial.firstapp.handler;

import org.pustefixframework.tutorial.firstapp.User;
import org.pustefixframework.tutorial.firstapp.wrapper.EnterUserDataWrapper;
import org.pustefixframework.web.mvc.InputHandler;
import org.springframework.beans.factory.annotation.Autowired;

public class EnterUserDataHandler implements InputHandler<EnterUserDataWrapper> {

    @Autowired
    User user;

    public void retrieveCurrentStatus(EnterUserDataWrapper wrapper) {
        wrapper.setSex(user.getSex());
        wrapper.setName(user.getName());
        wrapper.setEmail(user.getEmail());
        wrapper.setHomepage(user.getHomepage());
        wrapper.setBirthday(user.getBirthday());
        wrapper.setAdmin(user.getAdmin());
    }

}
If you restart the application, enter some data and then go back to the form, you can see, that the form fields contain the values that you wanted them to contain and that you entered before.
Another problem ist, that your pages are not protected against unwanted access. If you open the URL
http://localhost:8080/ReviewData, Pustefix will display this page,
although there is not data to review.
It is the responsibility of the application developer to make sure, that the page can only be
displayed, if it makes sense in the application context. However, Pustefix provides an easy
way to disable the availability of a page. The method prerequisitesMet will be called on
every handler, every time a page should be displayed. If this method returns false, the page
will not be displayed.
To protect the ReviewData page, you have to modify the prerequisitesMet method
of the SaveUserDataHandler handler. As the page should only be accessible, if a user has
been entered, you only need to check the User bean:
if no user name has been set, the method must return false, otherwise it must return true.
package org.pustefixframework.tutorial.firstapp.handler;

import org.pustefixframework.tutorial.firstapp.User;
import org.pustefixframework.tutorial.firstapp.wrapper.SaveUserDataWrapper;
import org.pustefixframework.web.mvc.InputHandler;
import org.springframework.beans.factory.annotation.Autowired;

public class SaveUserDataHandler implements InputHandler<SaveUserDataWrapper> {

    @Autowired
    User user;

    public boolean prerequisitesMet() {
        return user.getName() != null;
    }

}
If you now open the http://localhost:8080/ReviewData, the page cannot be displayed.
Now the workflow mechanism kicks in and selects the next page, that should be displayed. This is the Confirm
page, which has been defined as the final page of the workflow.
It would have been better, if the EnterData page would have been displayed instead of the Confirm,
page, as the user must enter data before any other page can be displayed. This can easily be achieved using Pustefix.
Each handler has a needsData method, which will be called, when the workflow mechanism selects the next
page to display. The workflow will start with the first page in the current workflow and if the needsData
method returns true, it will stop at this page until the handler is satisfied.
To make sure, that the user will stay on this page, you only need to implement the needsData method of the
EnterUserDataHandler handler: the method must return true, unless the user name
has been set.
public class EnterUserDataHandler implements InputHandler<EnterUserDataWrapper> {

    public boolean needsData() {
        return user.getName() == null;
    }

}
if you now try to access the ReviewData page directly, Pustefix will redirect you to the
EnterData page instead until you entered the data of a new user.
In this tutorial you learned the basics about the core features of Pustefix and developed a very simple, but typical, web application. For details about the features that you got to know in this tutorial, take a look at the comprehensive reference documentation, which describes all the configuration options, XML tags and interfaces in detail.
Table of Contents
In this tutorial you will learn how to create an AJAX application with Pustefix. As an example, you will build a very simple calculator, which does the real calculation in Java on the server. As in the other tutorials, the business logic has been kept extremely simple to focus on the tasks that are required to implement an AJAX application with the Pustefix framework.
No matter how complex your business logic is, the tasks required to set up an AJAX application will be almost the same as in this tutorial.
To build this tutorial, create a new project calculator as described in
Section 2.1, “Setting up a new project”. But this time, use the Maven archetype pustefix-archetype-application with the following data:
| Property | Value |
|---|---|
| groupId | org.pustefixframework.tutorial |
| artifactId | calculator |
| version | default |
| package | org.pustefixframework.tutorial.calculator |
| pustefixVersion | the latest version |
This Maven archetype will create an application which is already set up for AJAX applications, i.e. it contains the required Maven dependencies and configuration.
In Pustefix, a web service always has to consist of a service interface and an implementation. In this tutorial, you will implement a very simple webservice which provides three methods to execute mathematical operations.
Add two integer numbers
Subtract two integer numbers
Multiply two integer numbers
The interface for this business logic is very easy to implement:
package org.pustefixframework.tutorial.calculator;

public interface CalculatorService {
    public int add(int a, int b);
    public int subtract(int a, int b);
    public int multiply(int a, int b);
}
The implementation for this interface is not any harder to implement than the interface iteself:
package org.pustefixframework.tutorial.calculator;

public class CalculatorServiceImpl implements CalculatorService {
    public int add(int a, int b) {
        return a+b;
    }

    public int subtract(int a, int b) {
        return a-b;
    }

    public int multiply(int a, int b) {
        return a*b;
    }
}
Now that you have defined the interface for your service and also provided an implementation for it, the next step is to expose this service and make it available to the frontend.
This is done by adding a Spring bean definition for the service implementation and export this bean as a webservice.
Your Spring configuration file src/main/webapp/WEB-INF/spring.xml should look like this:
<?xml version="1.0" encoding="UTF-8"?>
<beans xmlns="http://www.springframework.org/schema/beans"
       xmlns:xsi="http://www.w3.org/2001/XMLSchema-instance"
       xmlns:aop="http://www.springframework.org/schema/aop"
       xmlns:context="http://www.springframework.org/schema/context"
       xmlns:ws="http://pustefixframework.org/schema/webservices"
       xsi:schemaLocation="http://www.springframework.org/schema/beans
                           http://www.springframework.org/schema/beans/spring-beans.xsd
                           http://www.springframework.org/schema/aop
                           http://www.springframework.org/schema/aop/spring-aop.xsd
                           http://www.springframework.org/schema/context
                           http://www.springframework.org/schema/context/spring-context.xsd
                           http://pustefixframework.org/schema/webservices
                           http://pustefixframework.org/schema/webservices/pustefix-webservices.xsd">

  <context:annotation-config/>

  <bean id="calculator" class="org.pustefixframework.tutorial.calculator.CalculatorServiceImpl"/>

  <ws:webservice
    id="CalculatorService"
    servicename="CalculatorService"
    interface="org.pustefixframework.tutorial.calculator.CalculatorService"
    ref="calculator"
  />

</beans>
With these steps, you have finished all Java and configuration work packages and can continue implementing the client
side of your application. Open the Home.xml file and add some HTML as a frontend for
your calculator application (we just use the default page of the generated application):
<?xml version="1.0" encoding="utf-8"?>
<include_parts xmlns:ixsl="http://www.w3.org/1999/XSL/Transform"
  xmlns:pfx="http://www.schlund.de/pustefix/core">

  <part name="content">
    <theme name="default">
      <h1>AJAX Calculator Tutorial</h1>
      <fieldset>
        <legend>Calculator</legend>
        A: <input type="text" id="a"/><br/>
        B: <input type="text" id="b"/><br/>
        <input type="button" value="add" onClick="add();"/>
        <input type="button" value="subtract" onClick="subtract();"/>
        <input type="button" value="multiply" onClick="multiply();"/>
      </fieldset>
    </theme>
  </part>

</include_parts>
The HTML page contains several controls:
Two text input fields (with ids
aandb), in which the user enters the two values, that are used for the calculation.A button labeled
addwhich will call the JavaScript functionadd()when clicked.A button labeled
subtractwhich will call the JavaScript functionsubtract()when clicked.A button labeled
multiplywhich will call the JavaScript functionmultiply()when clicked.
To implement an AJAX application, you will have to use JavaScript. This has been left out in the last example of your page.
We will add it in a separate part named head, which will be automatically included in the head section
of the page (this is done in the frame.xml previously created by the archetype - just to separate the HTML
from all your JavaScript includes and make the pages more maintainable).
Pustefix does not only provide server side implementation helpers for your AJAX applications, but also some client side JavaScript classes which hide all transportation details from you. Pustefix will also generate JavaScript stub classes for the Java services you have exported. Therefor you have to include the following files:
httpRequest.jsprovides an abstraction over the differentXmlHttpRequestimplementations in the different browsers.webservice_json.jsprovides an abstraction of theJSONWSprotocol used by Pustefix.The JavaScript stub for your calculator service is not available as a file, but is generated on demand. To include this generated JavaScript code, Pustefix provides the
<pfxwsscript/>tag, which takes the name of the service (as specified in the<webservice/>tag in your web service configuration) in thenameattribute. This tag will generate the<script/>tag that requests the generated JavaScript code from the server.
The following listing shows the according head part, you should add to your Home.xml file:
<?xml version="1.0" encoding="utf-8"?>
<include_parts xmlns:ixsl="http://www.w3.org/1999/XSL/Transform"
  xmlns:pfx="http://www.schlund.de/pustefix/core">

  <part name="content">
    <!-- content, including part "javascript-includes", see above -->
  </part>

  <part name="head">
    <theme name="default">
      <script type="text/javascript" src="{$__contextpath}/modules/pustefix-core/script/httpRequest.js"></script>
      <script type="text/javascript" src="{$__contextpath}/modules/pustefix-webservices-jsonws/script/webservice_json.js"></script>
      <pfx:wsscript name="CalculatorService"/>
    </theme>
  </part>

</include_parts>
If you are taking a look at the generated JavaScript code, you will see, that this code defines a new class called
WS_CalculatorService, which provides three methods:
add()subtract()divide()
These are exactly the same methods that the CalculatorService interface declared in your Java code.
//Autogenerated webservice stub (don't modify this code manually!)
function WS_CalculatorService(context) {
  pfx.ws.json.BaseStub.call(this,"CalculatorService",context);
}
WS_CalculatorService.prototype=new pfx.ws.json.BaseStub;
WS_CalculatorService.prototype.subtract=function() {
  return this.callMethod("subtract",arguments,2);
}
WS_CalculatorService.prototype.multiply=function() {
  return this.callMethod("multiply",arguments,2);
}
WS_CalculatorService.prototype.add=function() {
  return this.callMethod("add",arguments,2);
}
This class acts as a remote proxy for the Java business logic you implemented earlier. If you call any of these methods, the calculation will not be done on the client, but the request will be sent to the server, where it will be processed by the Java implementation. The response will then be sent back to the client and is available in your JavaScript application.
So all that is left to do, is implement the client side logic, that will create the proxy object and delegate the
calculation to it. You can just add the Javascript to the already existing head part of your page.
You are using the <pfx:script/> tag, which is used to insert inline JavaScript
into your page. In this script, you create a new instance of WS_Calculator and assign it to
a global JavaScript variable.
Furthermore, you implement the three missing functions add(), subtract() and
multiply(), which are called, if the corresponding buttons are clicked. All three methods are implemented
the same way: The values of the two input fields are read and the corresponding method of the proxy object is called with
these values. The return value of the proxy method is displayed to the user, using the alert() function.
<?xml version="1.0" encoding="utf-8"?>
<include_parts xmlns:ixsl="http://www.w3.org/1999/XSL/Transform" xmlns:pfx="http://www.schlund.de/pustefix/core">

  <part name="head">
    <theme name="default">
      <script type="text/javascript" src="{$__contextpath}/modules/pustefix-core/script/httpRequest.js"></script>
      <script type="text/javascript" src="{$__contextpath}/modules/pustefix-webservices-jsonws/script/webservice_json.js"></script>
      <pfx:wsscript name="CalculatorService"/>

      <pfx:script>
        var calcProxy = new WS_CalculatorService();
        function add() {
          var a = parseInt(document.getElementById('a').value);
          var b = parseInt(document.getElementById('b').value);
          alert(calcProxy.add(parseInt(a),parseInt(b)));
        }
        function subtract() {
          var a = parseInt(document.getElementById('a').value);
          var b = parseInt(document.getElementById('b').value);
          alert(calcProxy.subtract(parseInt(a),parseInt(b)));
        }
        function multiply() {
          var a = parseInt(document.getElementById('a').value);
          var b = parseInt(document.getElementById('b').value);
          alert(calcProxy.multiply(parseInt(a),parseInt(b)));
        }
      </pfx:script>
    </theme>
  </part>
</include_parts>
Now you can open the page, enter any two integer numbers and click on any button. Your application will send the request to your business logic on the server and display the result on the client without reloading the page.
This tutorial showed you, how to implement an AJAX application based on Pustefix in several minutes. While this example only used a very simple business logic and transferred only primitive type, AJAX applications in Pustefix are not restricted to built-in Java types. Pustefix is able to send any Java-bean style objects from the client to the server and vice-versa. You only need to make sure, that there is an empty constructor in your beans.